Thursday, September 15, 2011

Togs, Swimmers, Bathers

Last year I bought myself some vintage one-piece togs off Modcloth.
 I thought the expense was worth having a pair of togs that covered everything yet still made me feel sexy.

They did the job perfectly and I wear them happily.

However....

I miss being able to wear a two-piece.
I'm only a size 10 AUS so you think I'd be fine
but like a lot of mothers out there my stomach is a mass of loose skin and bad stretchmarks that extend to above my bellybutton.

I wouldn't let that loose on the unsuspecting public and I'd feel so self-concious that I know I wouldn't enjoy wearing them.

So imagine my delight when I found out Modcloth does high-waisted bikinis.

2b51c4fcccb04204f0067553e87bb878

For $90.

I could justify the cost for my first set of togs but for another set, just for vanities sake.....uh uh.

So my mind started twinkling.
I wonder, could I make my own?

I've made my own patterns in the past by using other items for reference.
Then as if it was meant to be, I recieved a Lincraft voucher as a thank you for coaching netball.

It was just enough for this gorgeous umbrella


and half a metre of Lycra and four red buttons.
There wasn't much to choose from at Lincraft, just bright purple, blue, pink, yellow and black.
So black it was.

And I did it!
I measured and sewed and adjusted and made these.
The bottoms have a high band and a front skirt with ruching.


I'm so happy.

Here's a photo of them on.


They feel awesome on and not a stretch mark in sight.

So even if I had to pay for the fabric and buttons,
all up it still only would have cost me $20.
You can't get cheap, crappy togs for that amount.

I'm sold!

Tuesday, September 13, 2011

Rock Around the Clock

Woo hoo!

 I just had my first Rock 'n' Roll dancing lesson

It was for freestyle rock 'n' roll which is where you learn different moves
but the dance isn't choreographed.


I learned the basics,
 the low spin,
the high spin,
the flick and half turn
and the 'under the arm twice'.

It's rather easy but looks really effective.

I love, love, love it.

I have no partner and had to dance with an instructor in his 60's but that was to my advantage because he knew what he was doing.

I can't wait for the next lesson.

Happy Days, here I come.

Sunday, September 4, 2011

EAT

Have a look at my new sign!
Doesn't it just fit perfectly with the bunting?


I've had these wooden letters for nearly a year and rediscovered them recently whilst sorting through some crap, I mean, really valuable stuff, that I've had sitting in a basket for months.

I painted and papered, sanded and varnished them to replace the sign that you would have seen in the previous post.


The "Oh Holy Night" sign......

......that I forgot to take down last Christmas.

Does anyone else do that?
Pack everything away then realise you've missed something and you're just too darn lazy to do anything about it even though it just means standing on a chair and lifting it off the hook?

Umm, no, not me either.


Anyway, after choosing the perfect paper for the letters I realised that the colour of the 'T' was pale blue. Nearly the very same blue I was using for the walls.
In fact, I colour-matched that paper to half strength for the wall colour.

Oops!
When I eventually painted the kitchen, all you'd see of the sign would be EA.

Luckily, I had a blank, already painted board that I was going to use for a handpainted sign two years ago.
Yeah, I'm really good at getting around to things.
A sign that was going to say
"Dittmar - established 1998".

Well, obviously due to my newly single state a sign like that would be kinda awkward.
So, with a bit of sadness I must admit, I used it to mount the letters
and I'm really happy with the result.


The kitchen has been the site of a few happy dances lately.
First the pantry door,
then the bunting
and now this.

I love it when things come together.

Friday, September 2, 2011

A new kitchen curtain and bunting

Well, the title says it all really.


As usual, my inability to focus on completing just one thing has shone again.
Whilst on the ground and painting the white floors in the kitchen, I looked up and decided that I really didn't like the blue gingham curtain that was hanging on my kitchen window, and had been there for years since my 'primitive' decorating phase.


A new curtain had to be made and of course, it had to be white.

(Here's a hint for you, whenever I'm browsing through op shops and I see white sheets of fairly good quality or thickness, I snap them up.
I use them for slip covers, cushions, and of course, curtains.)

So out came the sewing machine and up went the curtain, adding instant lightness to the room.
I was very happy.


But it needed something more.
I make bunting for friends and to sell but realised that I didn't have any in my own house.What!?
So I raided my stash of vintage fabrics and made some bunting just for me.

Look at that delicious prettiness!
I love bunting, it is so cheery and festive and it's amazing how something so small can change the feel of a room.


Of course, looking at the photos you can see how horrible the paint is.
Well, that's in the process of being changed right now and my spare time is once again taken up with scrubbing walls, filling gaps and sanding to get them ready for the light blue that's to come.

Saturday, August 27, 2011

Pantry Door Tutorial

Yesterday I briefly showed you photos of my pantry door that I did over.


Now the patchwork design is not my idea. Someone, somewhere on the web had posted photos of how they did the patchwork thingy using wallpaper scraps.


It was love at first sight.
(If you, genius person, happen to stumble over my humble blog and go, "That's my picture!" drop me a line so I can give you credit.)

Edit: I found who the creator was. It was done by Simone of Beach Vintage. There happened to be a photo of her standing in front of it in her latest post. Eureka! You'll see her in my favourite blogs roll down the side if you wanted to check out her site and see what more prettiness she has in store.

Now they were a lot more adventurous with their colours. I am meanwhile trying to streamline my look and colour scheme in the (mistaken?) belief that it will make my house look less messy and jumblesome. While my walls are green at the moment, sometime in the future they will be turned pale blue so I chose a colour scheme that incorporates the two, rather successfully I think. I also tried to choose patterns that looked vintage and/or wallpaper-ish.

I also was not so adventurous in using wallpaper, as I've never hung wallpaper or even walked into a wallpaper shop in my life.
As the scrapbooking paper had worked quite well here 


I thought I would go with it again.
The only difference was this time I used card instead of paper as it is less likely to get air bubbles.


Step 1.
 Measure the place to be papered then decide how you want to divide it up.

I went with three across and three down for the top panel and four down for the bottom panel.

(The bottom rectangles are slightly longer than the top panel as it didn't divide neatly to the same measurements but you can't even notice.)

Step 2.
Lay your paper out roughly in a design that is balanced and pleasing to your eye.


Step 3.
Cut out your first rectangle to the dimensions you've chosen.

If you're not a straight cutter, I would recommend using a stanley knife and ruler as any gaps between patches will be noticable.

Step 4.
Using your rectangle as a template, trace around the other pieces of card and cut them out.


Step 5.
Glue the card down.


I used PVA glue thinned with water so it brushed on easier. I also spread the glue onto the panel rather than onto the paper as it gave a more pleasing result.

If your card isn't too damp, you can use a ruler to spread it down evenly, otherwise rub your hand firmly over the card to try to eliminate any air bubbles.

Step 6.
Leave it to air dry (which doesn't take long, I waited an hour) then paint with two coats of varnish, leaving drying time between, of course.


I use Cabot's Cabothane water-based varnish in Satin.
I like it because it cleans up in water, doesn't smell and doesn't yellow.

Step back and admire.

I did mine on panels which I then had to nail onto the pantry door frame. The beauty of this was that the frame covered up any messy edges.
I'm going to tackle the linen cupboard doors next which are already complete so I'll have to take more care with my edges, but this is such a simple project, it's really hard to mess up.


It turns something plain and utilitarian into a real focal point and work of art.
Let me know how you go if you try it.

Friday, August 26, 2011

Doing up a door

Welcome to my new look blog.

I've been through a few different styles in the past and I've had lots of fun selecting a look and colour scheme that suits who I am now.

(If the font is too difficult to read, leave me a comment so I can change it.)

To celebrate opening the door to my new stage in life, I've given the back door a makeover.


It was painted the same green as the surrounding walls and I wanted to make a feature of it.

White always works wonders.


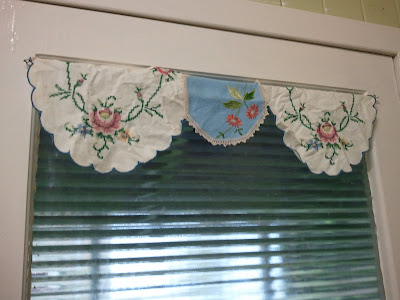
And it needed something pretty to dress it up and laud my love of vintage, so what better than some doilies.

I've also done over my pantry door with a patchwork look, which I love, love, love!


Tune in later for a tutorial on how to achieve the super easy look.


Get to know me

  • I love the smell of cinnamon and vanilla.
  • My favourite flowers are daisies.
  • My favourite trees are pine trees.
  • I always like to have the bickie jar full and a cake on the cake stand. I know...not that healthy, but so good to look at.
  • Autumn is my favourite month, although I do wish we had more of a change of colours up here in Queensland.
  • I love Anne of Green Gables and Laura Ingalls Wilder. They started my love affair with "old-fashioned" stuff.
  • I'm a boots and jeans kind of girl, but also love vintage skirts and dresses.
  • I like sewing and am in love with quilts at the moment.
  • I love reading. (I have a weakness for archeological thrillers and historical romances, but not Mills and Boon-type ones.)
  • I love old houses with character. No new estate houses for me. (Sorry Rosie.)
  • I love vintage/cottage/farmhouse decorating and pretty pinks and blues, with a splash of red for colour.
  • Polka dots can make me sigh with delight.
  • I have 4 chooks. They are MY pets. Another tick on my dream-come-true chart.
  • I don't eat dessert much any more. I'm not dieting, I just don't want it. (Does that mean I'm growing up if I say no to an icecream cone?)
  • I'll still always say yes to chocolate though!
  • I like to sit on the front stairs in the sun, to drink my morning cup of tea, while I contemplate what to do in the garden.
  • I've got the gardening bug again recently. It comes and goes with the weather. I'm envisioning cottage flowers in pink, blue and white to go with my green picket fence.